From dev to devices: Understanding Expo Build Profiles
Writing it here because I keep forgetting about it.

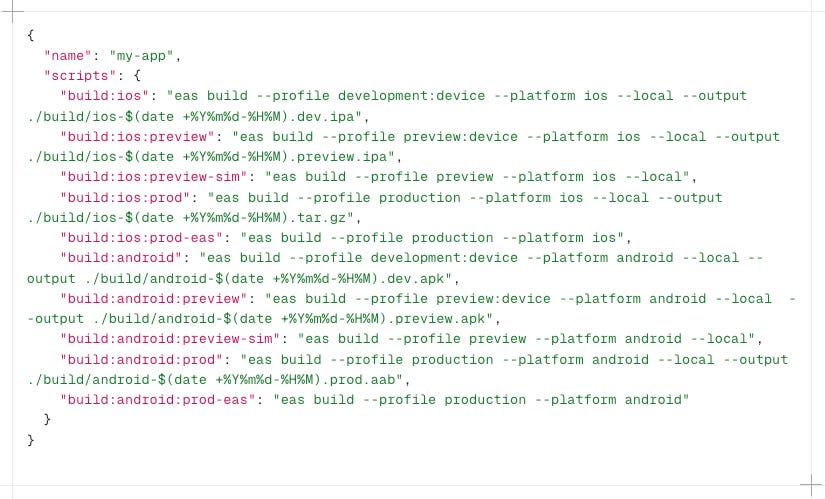
In Expo you can use Expo Go or development build. In this post, we are only discussing about the development build. Let’s start off with a package.json file that contains the build scripts we’ll use:
1. Local development (simulator, hot reload)
Command: bun ios or bun android
This is what we use for day-to-day development and the simplest to get up and running. The command will start expo dev server, open the simulator, install the app if it’s not installed, and finally opens the app.
2. Development build (device, hot reload, IPA/APK file)
Command: bun build:ios or bun build:android
Sometimes there are features that only work in real device, like notifications. To test the feature, we can run the app in real device while still connecting to Expo server that runs on our machine. The app will still have hot reload, and we can develop the app like usual. To be clear, even though you’ll have IPA/APK file from this, you can’t share it to other users (e.g. internal testers). The app will not run, as it needs to connect to your local Expo server.
3. Preview build (device, no hot reload, for pre-release or QA, IPA/APK file)
Command: bun build:ios:preview or bun build:android:preview
When you’re done with a feature development, you can create a production-like build that you install in your device (or internal testers’ devices). It doesn’t depend on Expo server, the app can use your production endpoints, and you don’t have to wait for approval from App Store or Play Store. Just run the build to create the IPA/APK file, share and download it to your device, then install.
With this build, it’s good to add some indicator, like in the name or the app icon. For example, if your app name is “My App”, then you want it to show as “My App (preview)” for the preview build. This way, the preview and production app can live side by side in your device. If you’re curious on how to do this, check the Expo documentation for “App Variants”.
4. Production build (device, no hot reload, for release or store submission, IPA/AAB file)
Command: bun build:ios:prod or bun build:android:prod
This is the release build that you can distribute to users. It should be nearly identical with the preview build (e.g. except for the app name suffix). Which means, you can be confident enough to run the build command for this and submit to app store, as long as you have tested the preview build. From here, the next step is to submit the app! With eas, you can run eas submit and follow the steps.
—
That’s it! Those are the 4 different builds from development to distribution. It’s not definitive and you can tweak your eas.json and package.json file to customize.
Bonus: The script also have
build:ios:prod-easandbuild:android:prod-eas. You can use it to run the build in eas instead of locally.
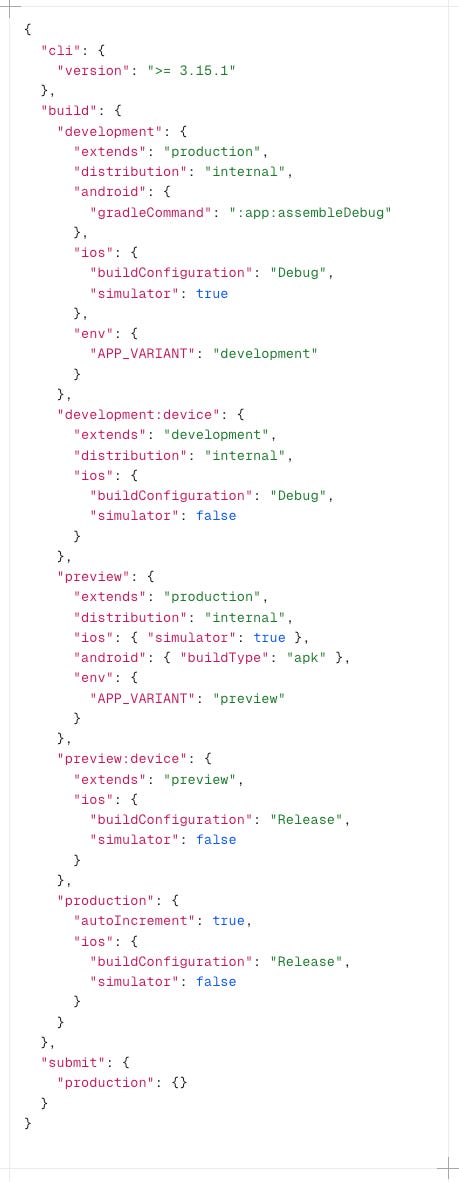
P.S: for reference, here’s my eas.json where I define the different build profiles.